MKC TOOLSShop Built Pantograph Engraving Machine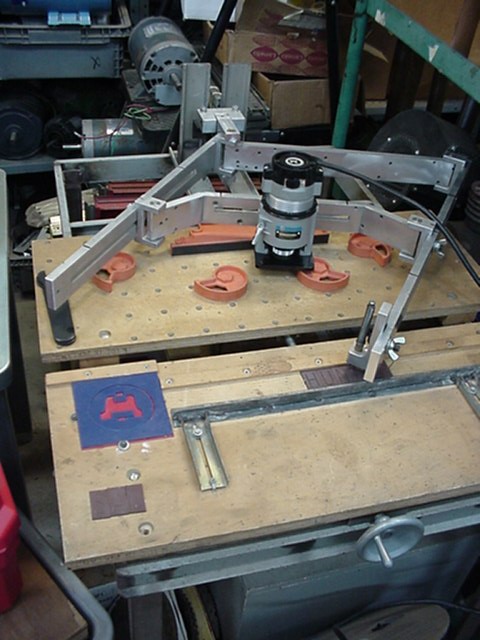

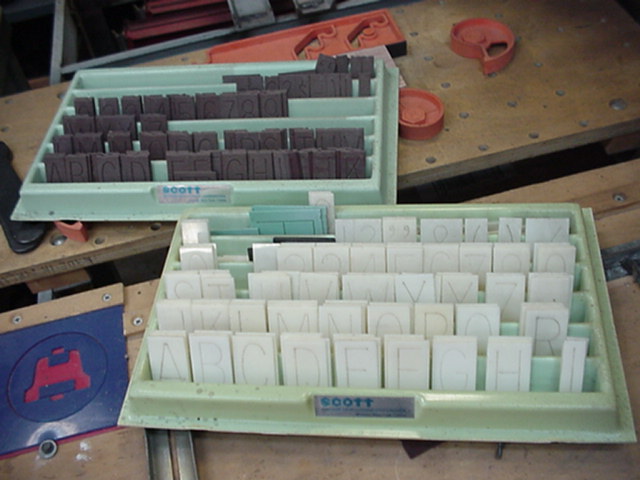
I designed and built this machine around 30 years ago. The pantograph is 1/2" x 2" aluminum stock with a Porter Cable trim router mounted to the center bar. The center bar was cut and welded to offset the router mount so that the router bit is centered on a line between the two pivot bearings. It is important for the router bit to be centered left to right on the pantograph and centered front to back between the tracing stylus and the main pivot point to get accurate reproduction of the master. OR, it must be off center in the same ratio for reductions other than 50% of the master. The clevis joints were made from 1" x 2" stock and ball bearings with 1/4" steel dowels. The bars are slotted and the hinge points are attached with wing nuts so that the reduction ratio can be set anywhere from 25% to 75% of the master. The only parts that I bought ready made were the spring loaded tracing stylus and 2 sets of master letters, which I bought from Scott engraving company in Dallas, and the router. 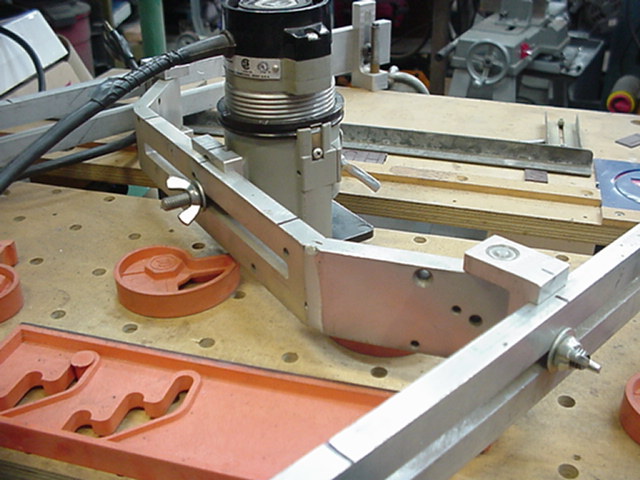

The PC router has two threaded holes in the base for mounting the edge follower guide that came with it and also a vertical ridge next to the holes for keeping the guide aligned. I machined an aluminum block with a slot to fit the ridge on the base and attach with the existing holes. The stud is a flat head 3/8 x 16 socket head cap screw and the block is counter sunk on the back side. The block is slotted to keep the router aligned with the pantograph bar. 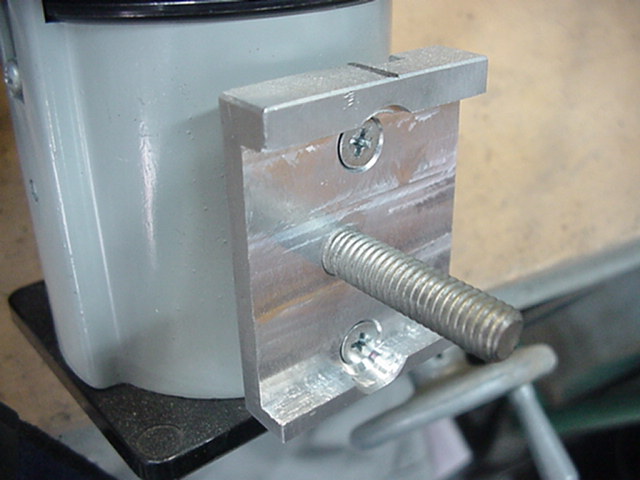
 I welded up an angle iron stand for it and used
1/2" x 2" steel C channel stock (surplus telephone company cable rack
steel) to make the adjustable brackets to mount the pantograph to the table.
The inside edges of the C channel are angled so that when mated facing each
other they make a nice dovetail like joint.
I can loosen the big 1/2" wing nuts and move
the base of the pantograph in or out and up or down to allow for different
sizes of stock. The tracing stylus is also mounted in a slotted channel for
the same reason to keep the pantograph parallel to the table front to back
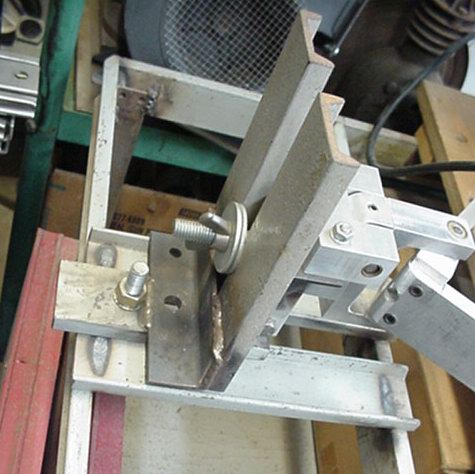
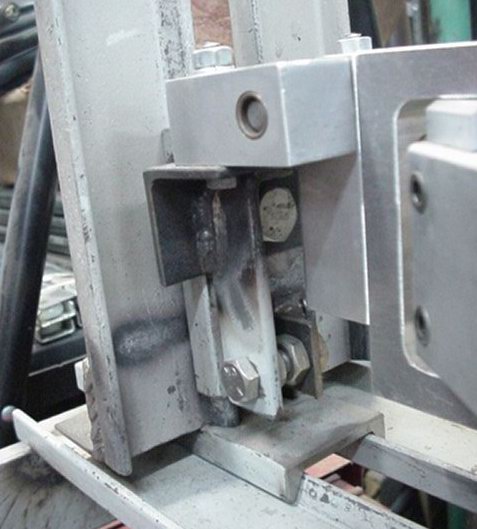
with any size stock up to 3". The main panto attach bracket is mounted with one bolt so
that is will swivel. The cross bolt at the bottom is for precision alignment
of the pantograph assembly so that it is perfectly parallel side to side with the table.
I welded up an angle iron stand for it and used
1/2" x 2" steel C channel stock (surplus telephone company cable rack
steel) to make the adjustable brackets to mount the pantograph to the table.
The inside edges of the C channel are angled so that when mated facing each
other they make a nice dovetail like joint.
I can loosen the big 1/2" wing nuts and move
the base of the pantograph in or out and up or down to allow for different
sizes of stock. The tracing stylus is also mounted in a slotted channel for
the same reason to keep the pantograph parallel to the table front to back
with any size stock up to 3". The main panto attach bracket is mounted with one bolt so
that is will swivel. The cross bolt at the bottom is for precision alignment
of the pantograph assembly so that it is perfectly parallel side to side with the table.
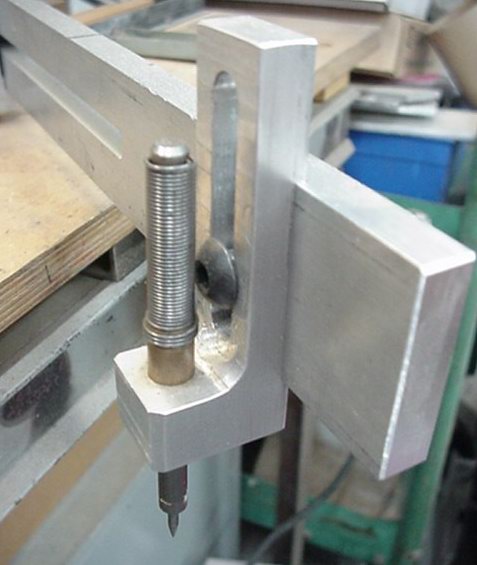
 The spring on the tracing stylus
lines up the bit in the letter or logo pattern before the bit inters the wood
and and keeps it lined up until the bit is clear of the wood on the completion
of each letter. Some master letter sets require a different size stylus point
so the points are interchangeable in the stylus holder. The letter sets are
expensive now, 100 to $200.00. I'm thinking that the Leroy letter templates could
be used but they are all slanted so to get straight letters you would have to
modify the geometry of the pantograph. That would take some experimentation.
Back when I bought my master letter sets they were about half the price they
are now.
The spring on the tracing stylus
lines up the bit in the letter or logo pattern before the bit inters the wood
and and keeps it lined up until the bit is clear of the wood on the completion
of each letter. Some master letter sets require a different size stylus point
so the points are interchangeable in the stylus holder. The letter sets are
expensive now, 100 to $200.00. I'm thinking that the Leroy letter templates could
be used but they are all slanted so to get straight letters you would have to
modify the geometry of the pantograph. That would take some experimentation.
Back when I bought my master letter sets they were about half the price they
are now.
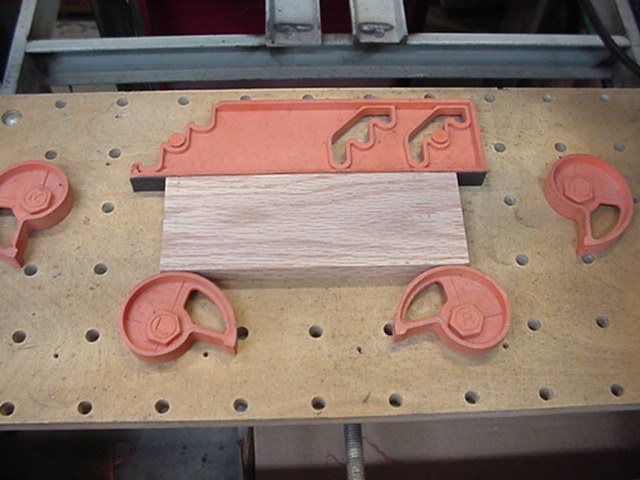
 I found a nice little cam lock vice (orange) to hold the
work piece to the adjustable table (hand crank on front). The vice calls
for drilling 3/8" holes on a 2" grid in your base. The cams and backing
block have 3/8" studs so that each part can be placed anywhere on the
table to accommodate any size or shape work piece. The cams are reversed
from each other so that when the piece is wedge in it cannot move in any
direction and all the vice parts are below the work piece surface. The work
holding table is also adjustable forward and back with the hand wheel on the
front of the machine. This allows adjusting the work piece to exactly the
right spot on the wood to start the engraving. I rigged up the adjustable rails
to hold the master letters and logo templates but that is to be improved when
I get the time. The machine works great for two dimension engraving. I have not
tried it on any three dimensional stuff.
I found a nice little cam lock vice (orange) to hold the
work piece to the adjustable table (hand crank on front). The vice calls
for drilling 3/8" holes on a 2" grid in your base. The cams and backing
block have 3/8" studs so that each part can be placed anywhere on the
table to accommodate any size or shape work piece. The cams are reversed
from each other so that when the piece is wedge in it cannot move in any
direction and all the vice parts are below the work piece surface. The work
holding table is also adjustable forward and back with the hand wheel on the
front of the machine. This allows adjusting the work piece to exactly the
right spot on the wood to start the engraving. I rigged up the adjustable rails
to hold the master letters and logo templates but that is to be improved when
I get the time. The machine works great for two dimension engraving. I have not
tried it on any three dimensional stuff.
Notice that the large main clevis joint is on axis with the rear pivot joint of the pantograph. When I first built the pantograph the left bar extended about 1" further and I had the mounting joint at the end of the bar. When I got it all finished and tried it out, the letters were all skewed rather drastically. I realized that the design caused the ratios to be off so I had to make the new part to span the rear joint of the pantograph to correct the problem. I also had the right arm too long out front and the tracing stylus out on the end of it. After I corrected the two issues the reproductions come out true. I intend to get drawings and dimensions made for this but it will take some time. 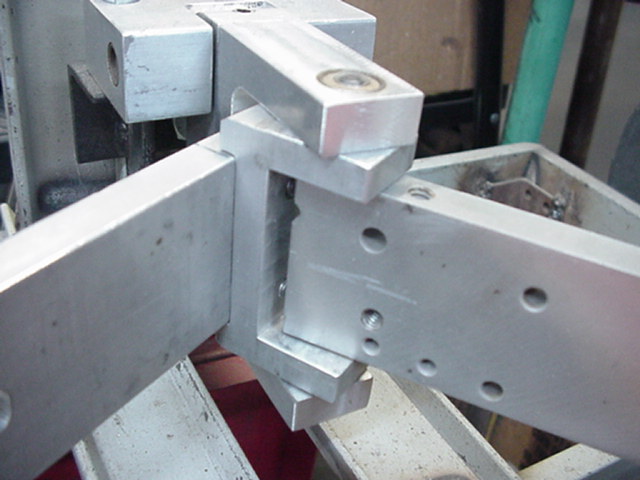
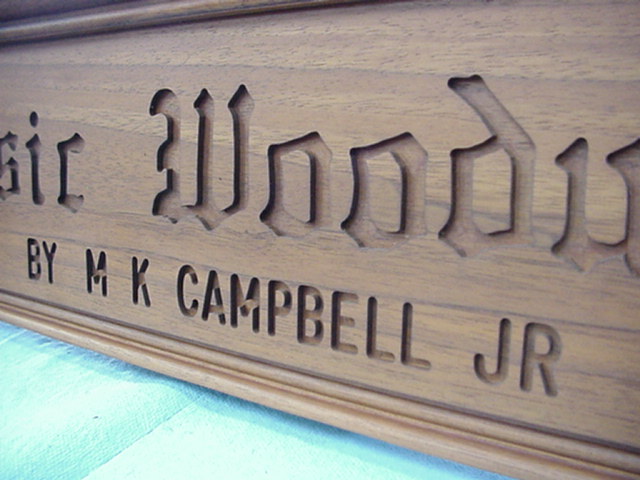
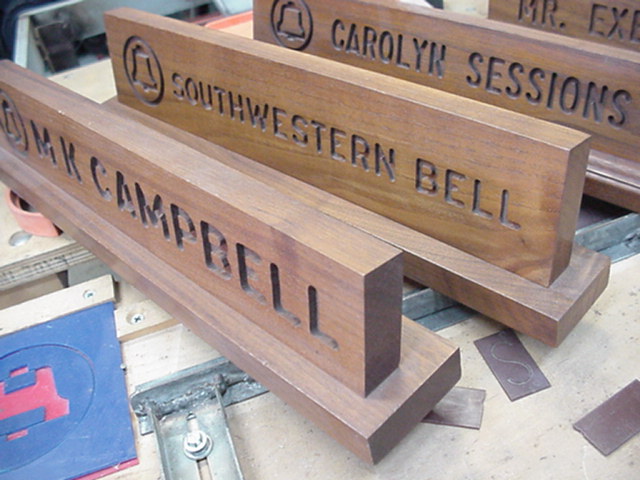
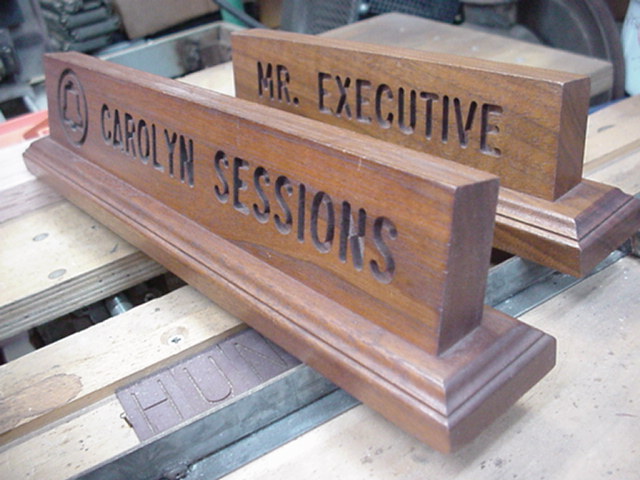
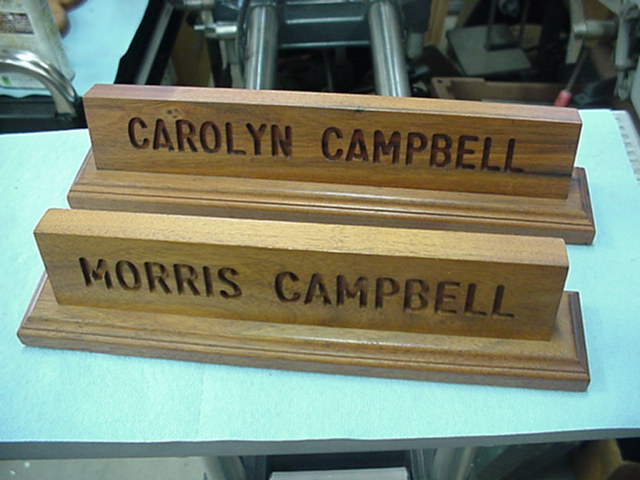
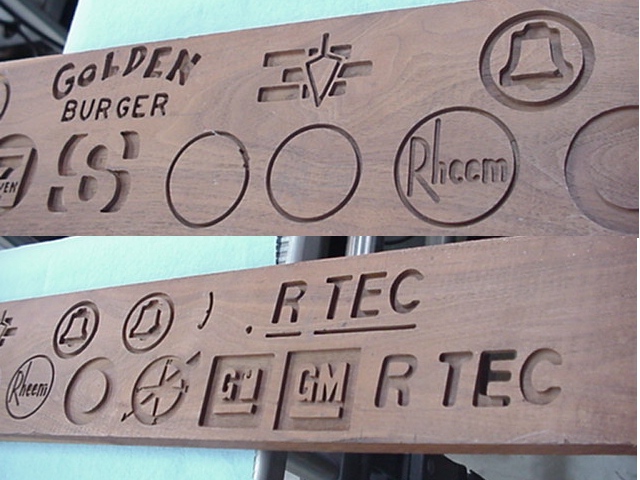
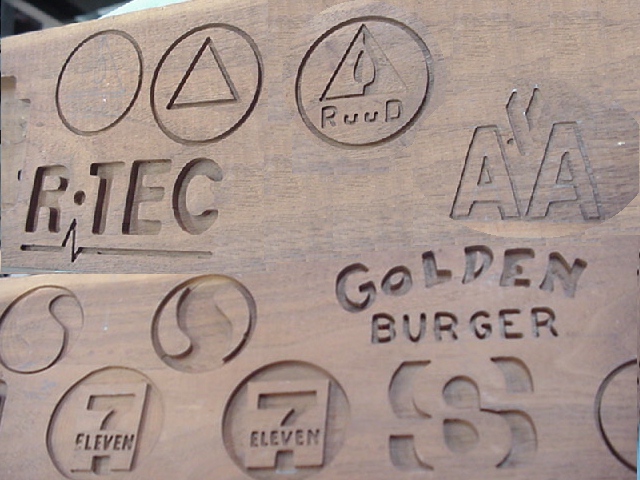
Pantograph History In around 1983 I made a desk nameplate with a Bell Telephone logo for my boss at the Ma Bell. After he set it on his desk at work other people started requesting them so I began a new business. I was just drawing the letters on the wood using sign stenciling templates and carving free hand with a router. I used 1/4" plywood patterns and a bushing in the router for the Bell emblem. I started doing logos for other companies for spouses of the Bell employees using the plywood patterns when I could but they were mostly free hand. I got pretty good at free hand routing but it required intense concentration, was time consuming and one slip required starting over. After making about 100 of them selling at 25.00 each I started looking for a machine to do the engraving to speed up the process. None of the machines I could find were capable of cutting a 1/8" wide by 1/8" deep slot in oak or walnut. They were for jewelry and plastic signs. Even the $ 5000.00 machines had small 12,000 rpm motors. I finally decided to build my own machine. The prototype was a pantograph of 3/4 x 2" oak with bronze bushings and 1/2" bolts for the joints. I purchased a little 1/3 HP Skill router for it. I bought a couple of sets of master letters and a tracing stylus from Scott Engraving company in Dallas. The rest of it I fabricated and designed myself. Sadly, I didn't get any pictures of the original pantograph. I made another hundred or so name plates with the machine but my time was cut from almost 2 hours down to about 30 minutes from rough wood to rubbing on the first coat of tongue oil. There was some slop in the joints of the pantograph which caused a slight nick in the letters here and there but you had to look hard to find them. I decided to upgrade to machine with an aluminum pantograph with ball bearing joints and nice little PC trim router. The result is what you see above. Here are some examples of the work. The M K Campbell sign was the very first one that I built. The Southwester Bell was one of the later ones done free hand before I built the pantograph. I got pretty good at it. The CAROLYN SESSIONS sign (my wife before we got married) and the MR EXECTUTIVE were done on the original oak pantograph. Notice I added the ogee edge to the base. Also shown is my practice board for other logos. 

 Contact by Email skip@mkctools.com
Or Call 817-319-2297 --- MKC Tools Home |